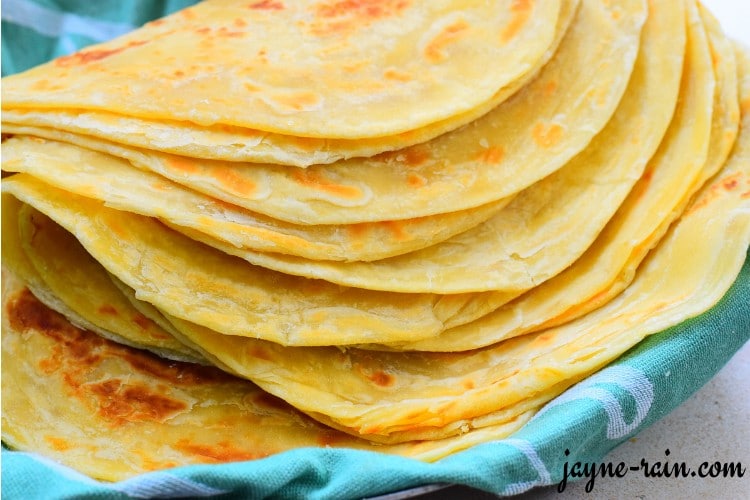
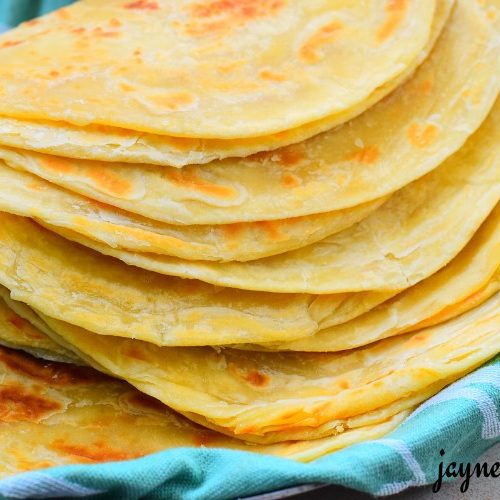
Easy East African Chapati recipe that’s made without yeast or baking powder. You’ll love how soft and pliable this Kenyan chapati is, making it perfect to use as a wrap or to dunk into sauces. The possibilities are endless!
If you know anything about East Africa, then you surely know that No Holidays Are Complete Without Some East African Chapati. They are the holiday dish, and I must admit that this multi-layered makes it to our table regularly…not just the holiday.
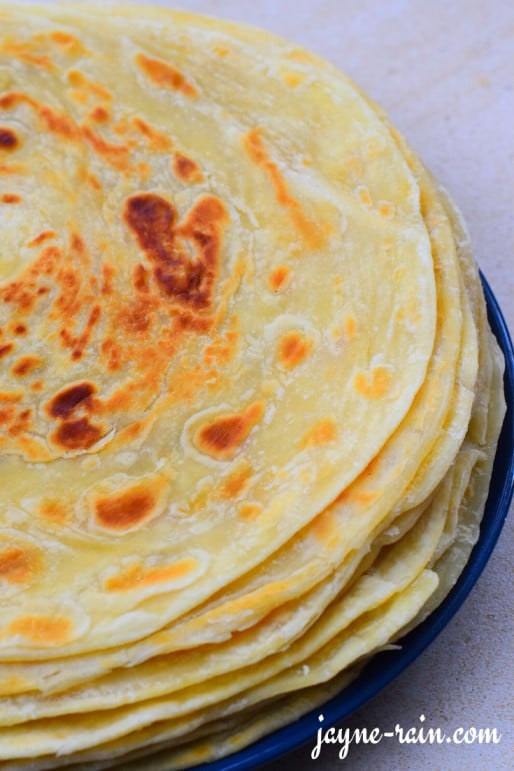
Making super-soft, multi-layered, East African Chapati might seem intimidating at the beginning, but once you master a few hacks, it’s super easy. The most critical factors in achieving the best East African Chapati is having the perfect water-to-flour ratio and kneading for the right amount of time till dough is smooth and supple.
What Is East African Chapati?
East African Chapati also known as Roti, safati, shabaati, phulka and roshi, is an unleavened flatbread.
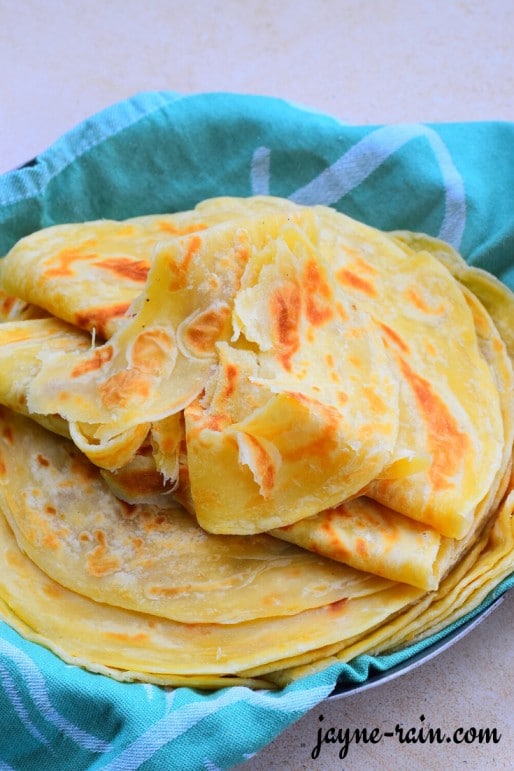
Origin Of East African Chapati
This Chapati originates from India and is a staple in East Africa. Apart from Kenya, East African Chapati is also a staple in countries like Tanzania, Uganda, Zanzibar, and Burundi.
Indian Chapati Vs. East African Chapati
Unlike the Indian Chapati that has no layers and uses no oil in preparation, the East African Chapati is multi-layered and use a substantial amount of oil in the preparation; more like the Indian Parantha.
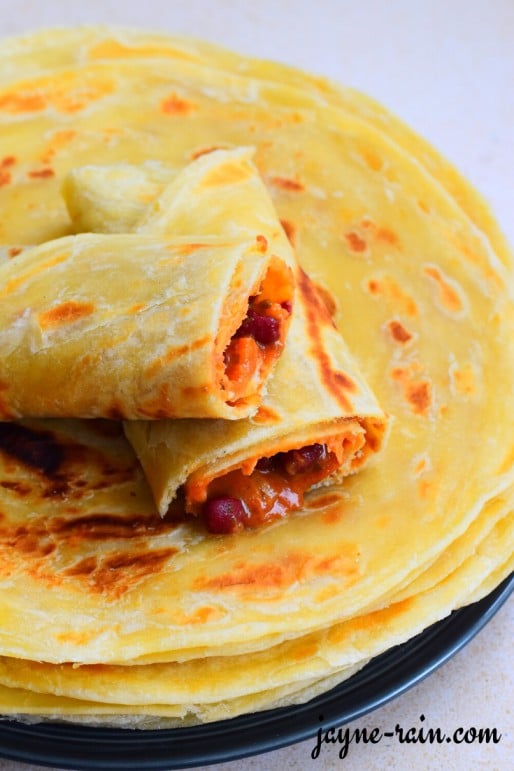
What goes in East African Chapati?
- All-purpose flour
- Salt
- Sugar (optional)
- Water
- Oil OR Ghee
How To Prepare East African Chapati Dough
FIRST: In a large mixing bowl, add water, oil, sugar and salt and mix well. Add flour and mix with a wooden spoon till the mixture comes together. Turn the dough onto a lightly floured surface.
With lightly floured hands, knead the dough for about 10 to 15 minutes until smooth and supple dough is achieved. The longer you knead, the softer your East African Chapati will be. Poke the dough with your finger; if it slowly bounces back, your dough is ready.
Alternatively, make the dough using a Kitchen Aid with a dough hook attachment for 5 to 8 minutes.
SECOND: Divide the dough into 12 to 14 pieces and form them into balls between your palms or between the kitchen countertop and your palm. Cover the balls with plastic wrap or a clean kitchen towel and allow to rest for at least 15 minutes.
THIRD: Lightly flour your working surface and work on one dough ball at a time. Gently press with fingers and roll out as thin as you can with a rolling pin.
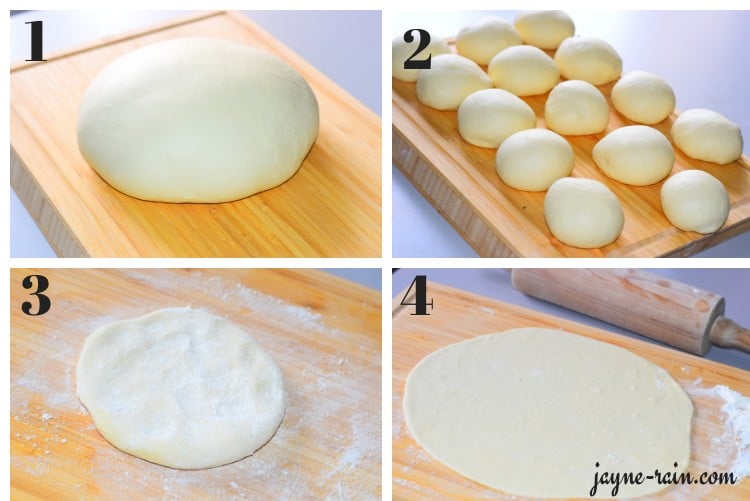
FOURTH: Gently brush the rolled dough surface with melted butter OR Ghee OR Oil. Follow by sprinkling some flour all over it. Once that is done, roll the dough like you would roll a yoga mat.
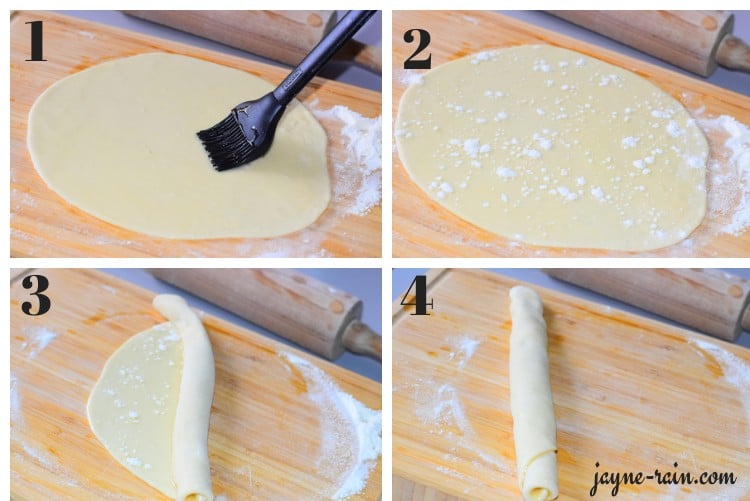
FIFTH: After that, coil the mat-like-dough and tuck the end in the middle of the coil. Repeat the process with all the dough balls. This is the process that will ensure layers in your East African Chapati. Cover the dough once more and allow to rest for at least 10 minutes.
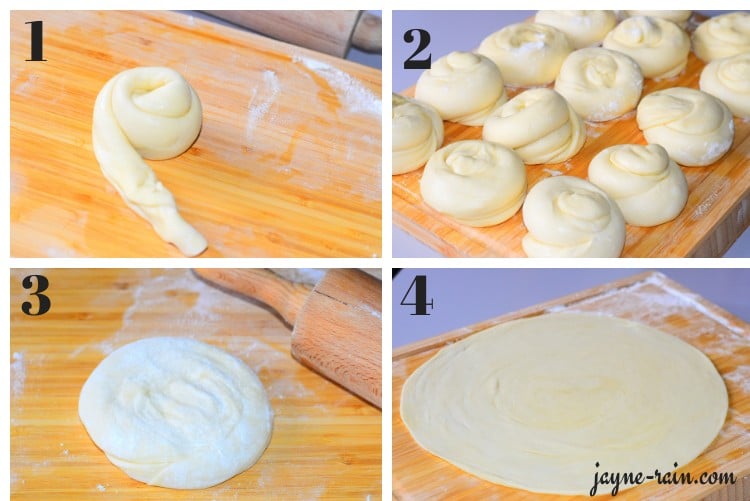
SIXTH: Working with one dough at a time, lightly flour the work surface and roll out the dough using a rolling pin to a thin 20 cm (slightly thicker than a tortilla) circle.
How To Cook East African Chapati
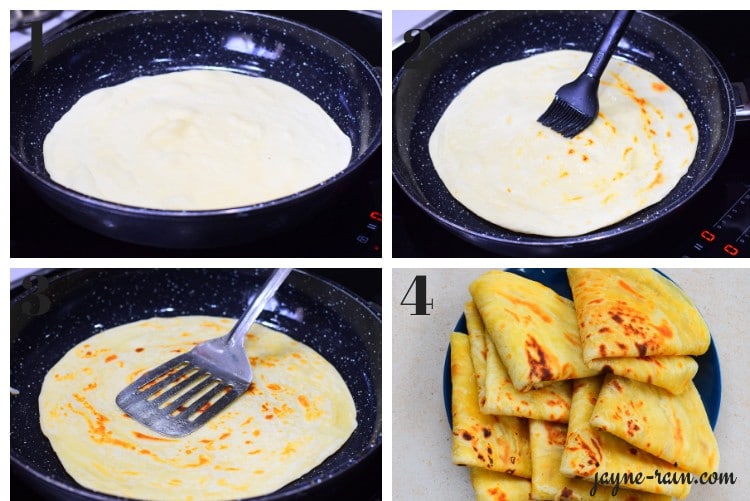
SEVENTH: Heat a skillet over medium-high heat and place the rolled out dough.
Cook for about 30 seconds till bubbles appear on the upper side and flip. Brush the upper cooked surface with melted butter/ghee/oil and once you are done, flip back to the original side.
(At this point, both sides have been partially cooked without oil and the surface on the frying pan is brushed with oil).
Now, brush the upper side too with oil and using a flat spatula, press Chapati gently against the skillet for 15 seconds. Flip once more and press the other side gently against the skillet too. Remove the Chapati from the skillet and store in a container covered with a clean kitchen towel.
How Do You Tell If Chapati Dough Is Kneaded Enough
If the Chapati dough doesn’t spring back when pressed with a finger, or tears when you pull it, it needs more kneading. If it springs back immediately when lightly pressed, and doesn’t tear when you pull it, it’s been kneaded enough.
Is Oil Necessary For Chapati Dough?
Yes, oil helps the dough to stay soft and pliable. That way your chapati will be soft and chewy. Without oil, the chapati won’t have a soft and chewy texture and any leftovers will dry up faster.

Can I Make Chapati Dough Ahead?
Yes you can make the dough ahead of time. As a matter of fact, when the dough stays for a day in the fridge, it results is softer and chewier Chapati.
To make it ahead, simply transfer the dough to an air-tight container and refrigerate for up to a day. Allow the dough to come up to room temperature before rolling and making chapati.
Alternatively, make the dough as described above, then transfer to a freezer-suitable air-tight container and freeze for up to 3 months.
How To Serve East African Chapati
Some of the most common traditional accompaniments for East African Chapati are;

How To Store, Freeze, And Thaw Cooked Chapati
To Refrigerate, transfer your leftover Chapati in an air-tight container and keep in the fridge for up to 4 days.
Alternatively, transfer to an air-tight freezer-suitable container and freeze tortilla for up to 3 months.
To thaw, remove from the freezer few hours before your meal and leave in the fridge or on the kitchen countertop till fully thawed.
Reheating Leftover East African Chapati
In The Skillet: Reheat Chapati on both sides for 30 seconds in a hot skillet once defrosted.
In The Microwave: Warm East African Chapati for 15 to 20 seconds in the microwave.
More Tips For Perfect Chapati
- Make sure you use the right amount of water. Too little water will lead to tough and dry chapati and too much water will lead to dough that is too wet to work with.
- Always make sure that the dough is kneaded till soft and supple. Kneading the dough to perfection is essential. If the dough is not kneaded long enough, the gluten will not be activated and the texture of the Chapati will be compromised.
- Everytime you are kneading a sticky dough by hand, wear disposable kitchen hand gloves. I find that wearing disposable kitchen hand gloves make it easier.
- Alternatively, when having difficulty with a sticky dough, cover and rest it for at least 15 minutes to 1 hour. This step helps to relax the gluten which automatically lightens the kneading process.
- Use a flat Skillet to cook Chapati and adjust your Chapati size to your skillet size.
PIN IT FOR LATER
Similar Recipes For You To Try:
East African Chapati Recipe
Ingredients
- 500 g All-purpose flour (sifted to remove any lumps)
- 50 g All-purpose flour (for kneading and dusting)
- 280 ml Water lukewarm
- 1 tsp Sea salt
- 1/2 cup Ghee OR butter OR oil
- 1 tsp Sugar optional
Instructions
- In a large mixing bowl, add water, oil, sugar and salt and mix well. Add flour and mix with a wooden spoon tillthe mixture comes together.
- Turn the dough onto a lightly floured surface. With lightly floured hands, knead the dough for about 10 to 15 minutes until it is smooth and supple.
- Alternatively, make the dough using a kitchen aid with a dough hook attachment for 5 to 8 minutes.
- Divide the dough into 12 to 14 pieces and form them into balls between your palms or between the kitchen countertop and your palm.
- Cover the balls with plastic wrap or a clean kitchen towel and allow to rest for at least 15 minutes.
- Lightly flour your working surface and work on one dough ball at a time. Gently press with fingers and roll out as thin as you can with a rolling pin.
- Gently brush the rolled dough surface with melted butter/Ghee/Oil. Follow by sprinkling some flour all over it.
- Once that is done, roll the dough like you would a mat. After that, coil the mat-like-dough and tuck the end in the middle of the coil.
- Repeat the process with all the dough balls. This is the process that will ensure layers in your East African Chapati.
- Cover the dough once more and allow to rest for at least 10 minutes:
- Working with one dough at a time, lightly flour the work surface and roll out the dough using a rolling pinin to a circle.
- Heat a skillet over medium-high heat and place the rolled out dough.
- Cook for about 30 seconds till bubbles appear on the upper side and flip. Brush the upper cooked surface with melted butter/ghee/oil and once you are done, flip to the original side. (At this point, both sides have been partially cooked without oil and the surface on the frying pan is brushed with oil).
- Now, brush the upper side too with oil and using a flat spatula, press chapati gently against the skillet for15 seconds.
- 16. Flip once more and press the other side gently against the skillet too. Remove the chapati from the skillet and store in a container covered with a clean kitchen towel.
THIS RECIPE WAS FIRST POSTED ON THE 20.07.2018 AND HAS BEEN UPDATED WITH NEW PHOTOS
If you love this East African Chapati recipe, leave me a comment with star rating and share your thoughts. I would love to hear from you.
Also, follow me on Facebook and Instagram.
![]()

These are amazing!! I have never made chapatis before but I wanted to try and make them for my husband who is from Kenya. He loved them, thank you so much
Hi Anon, I am thrilled it worked out so well for you. Thanks so much for stopping by…much appreciated.
Loved it. I followed this recipe and it came out great.
Wow, that is amazing. I am glad it worked out so well for you and thanks for stopping by.
Best Chapati I have ever made tried it twice and my family loved it can’t wait to try more of your recipes
I indeed tried out many recipes but ma chapos came out hard I ask ma self y now I have got the solution. Thanks so much jayne. And they r so nice with beans in Uganda we call it (kikomando) a mixture of beans and chapati
Hi Tabuley, I am so glad this recipe has worked out for you. Thanks so much for your feedback. Appreciated.
Pingback:7 Ugandan Dishes You Have To Try – Big 7 Travel Guide
Pingback:Busega Scotland
Turned out flaky and delicious. Thanks so much
Thanks for the feedback. I am so glad you loved the Chapati.
Hi! Your recipe looks amazing and I have such fond memories of eating chapatis made over open fires on our visits to rural Kenya. I know weight based measurements are better but we don’t have a scale. Any chance you know the cup conversion?
I tried your recipe and my family has been talking about these chapatis since last night! I added grated carrots and some crushed onion and garlic to up the flavor a bit. Thank you for this amazing recipe.
Best recipe I have used so far! It is explained very well for beginners like myself! Thank you!
Thanks for sharing indeed i likeEast African Chapart i triés it home for m’y hubby and it was soft and delicious,but is it fine to add carry powder in a charpat
Hi Joan, I am glad you and your hubby enjoyed the chapati. I have never tried it with curry powder but I think it would definitely taste good. I would put 1/2 to 1 teaspoon max for starters and adjust from there. I hope this helps.
Thank you for the recipe. First time to make chapati and it comes out soft. The whole family was happy.
That is Awesome Dongy. My goal with this Blog is to help families put delicious food on the table and I am always glad when I get this kind of feedback. Thanks so much and hope to see you around more often.
The first time I have made chapati and it was soft. Thank you for the recipe. Did it with meat stew. The whole family was happy.
Awesome to hear. Thanks for sharing.
Jayne, you’re my hero. I have tried to make chapati forever but they always come out hard. I love to cook & always pick up recipes so quick but everytime ive tried I failed. I was so impressed with yo recipe, I followed it to the T and only added onion, I must say they’re the best ever. I’m so happy & can’t thank you enough. God bless you hun 🙏 yo the best!
Seriously, your feedback made a bit emotional. I am so glad that I have been of help to you in the kitchen and hope to see you around more often.
Hey Jayne, This is best chapati recipe i have found so far. I have tried many Chapati recipes from the internet and none of them seemed to work for me; until i tried yours. Turned out pretty good. I can now confidently cook chapatis more often.
Awesome Awesome Awesome. I am so glad it worked out so well for you and thanks for sharing.
We are a family living in Ireland who moved here from Kenya 4 years ago! I made these chapatis for my kids who grew up there and they were instantly transported back! I served them with your African Bean Stew recipe and both were so delicious! Thank you!!
I totally understand what you mean when you say “they were instantly transported back”. At times that is the best we can do when we want to connect back to our roots and I am so glad this recipe contributed to that.
Gotta love Kenyan food!! I love seeing the dishes i grew up on shared on other blogs so beautifully! Your chapos look excellent!!
Thanks, Kaluhi. I do love Kenyan food for real. Thanks for stopping by.
My mouth was literally watering as I read your recipe!!!! So yummy!
🙂 make some and enjoy Portia. Thanks for sharing.
Looks so delicious and I love the versatility of Chapati!
Yes Jazz. Chapatis are so delicious and versatile.
What a delicious and simple recipe! They turn out so light and airy every time I make them. Perfect for a quick side to our main meals.
I am so glad it worked out so well for you and thanks for sharing.
I’ve had this in restaurants before but never knew it’d be so easy to make. This would be a perfect addition to our weekly menus since we always make bean stew and lentils!!
Chapatis are definitely perfect with lentils and beans. Make a big batch and enjoy.
What a simple and delicious addition to any meal!
Absolutely. I am glad you think so too and thanks for stopping by.
This would be a great recipe for me to try now with the extra time I have!
These chapatis are so easy to make, I am sure you would have fun making these even with limited time. Thanks for sharing.
omg this looks delicious! I can’t wait to try this with curry and stew!
Do that Tisha…curry and stew are perfect accompaniments for chapati.
These look delish! Plus the recipe looks easy!
That is true Desirée. Chapatis are so easy to make.
I’ve never made Chapati before and this recipe has me very excited to try. I love the step by step photos. Thanks for the great recipe!
You are welcome, Capri. Make a batch and enjoy.
These African Chapatis look amazingly flaky! I could eat these with so many things. I love how easy they are to make!
Thanks for your input Shanika
I can never get my chapati into a perfect circle! Yours is so beautiful and looks so flaky.
Practice makes perfect Marta. Just make these a few more time and before you realize, you will have perfect circles too. 🙂 🙂
Only made half the batch as I wasn’t sure how well they will turn out. They were delicious, fluffly and soft . The instructions were easy to follow, I will definitely be making them again.
That is great to hear VB and I am glad it worked out so well for you.
This East African Chapati Recipe is one of the best I
have ever tried! 🙂 Congrats!
Thanks, Caterina. I am humbled and glad that it worked out so well for you.
WOW, This Chapati recipe is worth sharing. It came out perfect.
I am super Glad you loved it.
So decadent! I can’t wait to present this on my table. I love each & every one of your recipes
That is so amazing Desmond. Thanks for sharing
Your recipes never disappoint. This was just what I was looking for. Thanks for another great recipe.
Glad you loved it and thanks for sharing.
So GOOD! Definitely easier than I thought. I made these and everybody loved them. So yummy and easy to put together!
That is great to hear. I am thrilled that everybody loved it.
This recipe is soo good! I love how soft they came out. Seriously delicious!
I am glad you loved it as much as we do.
This recipe was absolutely delicious! Everyone in the family loved it. Can’t wait to look through more of your recipes and try them.
I am glad your whole family loved it. Do make more and let me know what you think.
I finally made this recipe for my boyfriend we really enjoyed it. Thanks Jayne Rain, it was fantastic.
That’s great, Betty 🙂 Thanks for sharing.
Thank you very much for this recipe.
You are welcome Hirwa.